Budget-Friendly Patio Decorating Ideas
Transforming your outdoor space into a charming and inviting retreat doesn’t have to break the bank. With a little creativity and some budget-friendly tricks, you can enhance your patio or balcony to make it a welcoming oasis. Whether you’re hosting a summer barbecue or enjoying a quiet evening under the stars, these affordable decor ideas will spruce up your space without draining your wallet. Keep reading to see these Cheap and Easy Outdoor Decor Ideas for Your Patio or Balcony.
In case you’re in a hurry…
What is the cheapest outdoor patio option?
One of the cheapest outdoor patio options is using gravel or crushed stone, which provides a simple yet effective solution for creating a durable and low-maintenance surface. Additionally, opting for concrete pavers or repurposed materials, such as pallets or bricks, can further reduce costs while offering a customizable and stylish patio design. Consider using a faux wood pathway like this one on Amazon.
How can I make my porch look nice on a budget?
To create a beautiful porch on a budget, consider using thrifted or upcycled furniture pieces, complemented by vibrant, low-cost outdoor cushions and rugs to add color and comfort. Incorporate plants in DIY planters from inexpensive materials, like painted tin cans or wooden crates, to bring a touch of nature and charm to the space. This is where you can find the affordable Outdoor String Lights.
How do you dress up a boring patio?
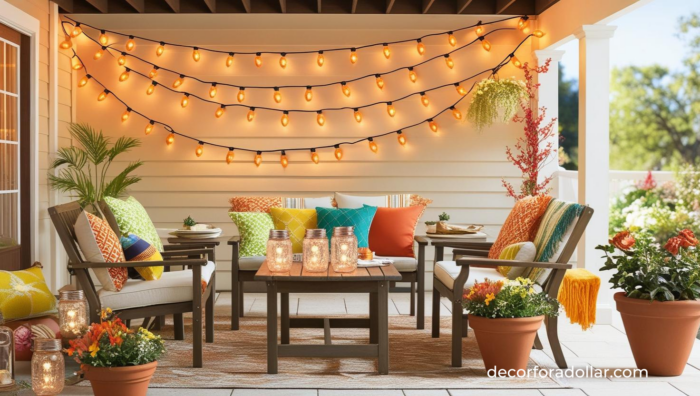
To transform a dull patio into a vibrant outdoor oasis, incorporate colorful cushions, rugs, and hanging string lights to add warmth and personality. Additionally, introduce potted plants and unique decorative elements like lanterns or wall art to enhance the space’s charm and create a cozy atmosphere for relaxation and entertainment. Find affordable Outdoor Cushions here.
How to make a patio look attractive?
To make a patio look attractive, start by incorporating a mix of comfortable seating options and vibrant outdoor cushions to create a cozy and inviting atmosphere. Add elements of nature with potted plants and decorative lighting, such as string lights or lanterns, to enhance the ambiance and provide warmth during evening gatherings. These attractive solar lanterns will instantly enhance your outdoor room.

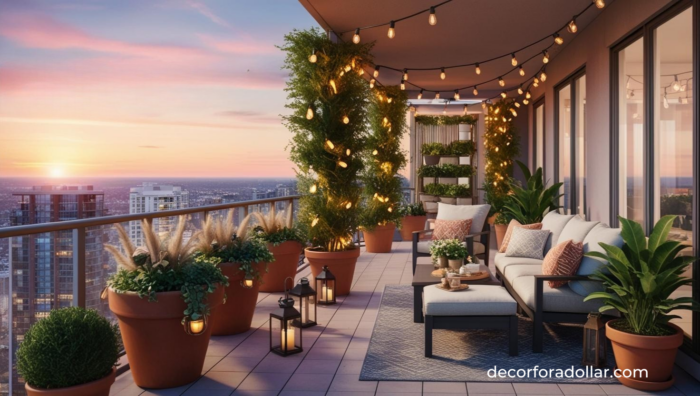
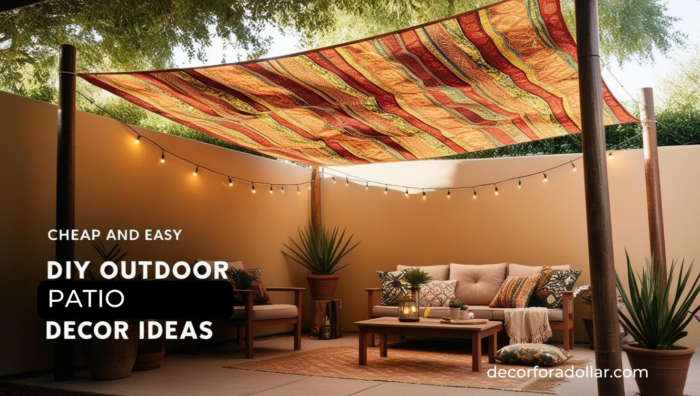
1. DIY String Light Canopy
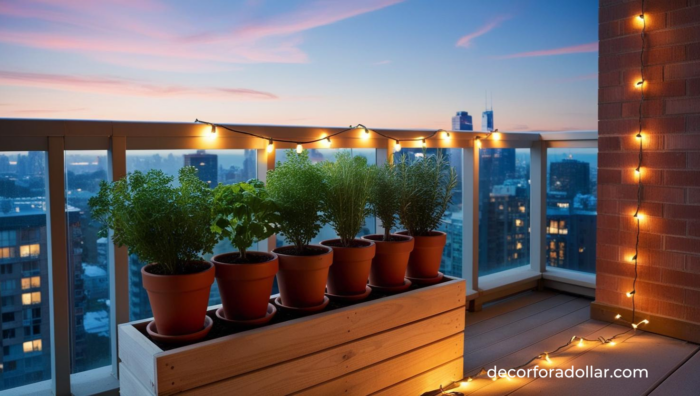
String lights are a simple yet effective way to add warmth and ambiance to any outdoor area. Create a canopy effect by draping string lights across your patio or balcony. Secure them with hooks or nails, and let the soft glow set a magical atmosphere during the evening. This is where you can find the affordable Outdoor String Lights in this post.
DIY String Light Canopy Tutorial
Transform your outdoor space into a magical oasis with a DIY string light canopy. This project is perfect for creating a cozy ambiance for gatherings, parties, or simply relaxing under the stars. Follow these simple steps to create your own enchanting canopy of lights.
Materials Needed
- String lights (LED lights are recommended for energy efficiency)
- Outdoor extension cords
- Hooks or cup hooks
- Zip ties or cable ties
- Ladder
- Measuring tape
- Pencil or chalk
- Power drill (if needed for making holes)
- Optional: Poles or wooden stakes (if attaching to trees or structures is not possible)
Instructions
Step 1: Plan Your Layout
- Choose the Location:
- Decide where you want to set up your string light canopy. Popular choices include patios, decks, or over a seating area in the garden.
- Design the Pattern:
- Consider how you want your lights to hang. Common patterns include a zigzag, crisscross, or circular pattern. Sketch the layout on paper to visualize the design.
Step 2: Measure and Mark
- Measure the Area:
- Use the measuring tape to determine the length of string lights needed for your chosen pattern. Ensure you have enough lights to cover the entire area.
- Mark the Anchor Points:
- Use a pencil or chalk to mark where each light string will be anchored. These marks should be equidistant to create a balanced look.
Step 3: Install Hooks or Poles
- Attach Hooks:
- If attaching to existing structures like a pergola or wall, use a power drill to install hooks or cup hooks at the marked points.
- Use Poles:
- If no existing structures are available, plant sturdy poles or wooden stakes into the ground at the marked points. Ensure they are stable enough to hold the lights.
Step 4: Hang the Lights
- String the Lights:
- Starting from the power source, begin hanging the string lights according to your chosen pattern. Secure them with hooks or wrap them around poles.
- Secure with Zip Ties:
- Use zip ties or cable ties to secure the lights in place, ensuring they are taut and do not sag.
Step 5: Connect and Test
- Connect Extension Cords:
- Connect the string lights to an outdoor extension cord if needed. Make sure connections are secure and protected from water exposure.
- Test the Lights:
- Plug in the lights to ensure they work correctly. Adjust any sagging sections and double-check that all lights are evenly spaced.
Step 6: Enjoy Your New Canopy
- Once everything is in place and working, step back and enjoy the cozy, inviting atmosphere your new string light canopy creates.
With these simple steps, you can easily add a touch of magic to your outdoor space. Enjoy the warm glow of your DIY string light canopy during evenings spent with friends and family! This is where you can find the affordable Outdoor String Lights in this post.
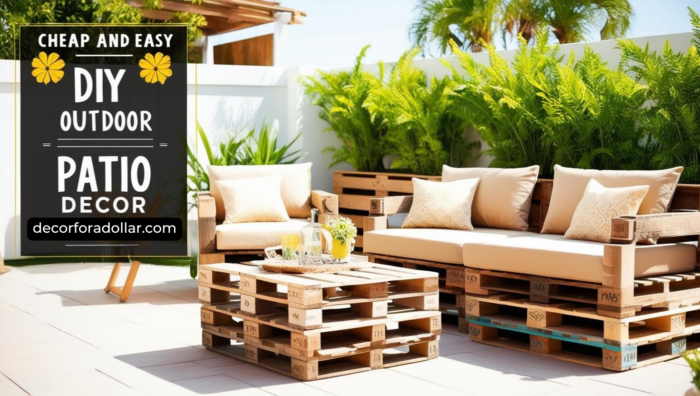
2. Repurposed Pallet Furniture
Old wooden pallets can be transformed into chic and rustic outdoor furniture. Use them to create a cozy seating area with a simple DIY bench or table. Just add some cushions and a coat of weather-resistant paint, and you’ll have a stylish setup for lounging.
Check out this affordable pallet furniture online.
Quick Tutorial: Repurposed Pallet Furniture
Repurposing pallets into furniture is a creative and sustainable way to furnish your home or garden. Here’s a step-by-step guide to help you transform old pallets into unique and functional pieces.
Materials Needed
- Wooden pallets (ensure they are clean and in good condition)
- Sandpaper or an electric sander
- Hammer and nails or a drill and screws
- Saw (hand saw or electric, depending on your comfort level)
- Wood stain or paint (optional)
- Paintbrush or roller
- Measuring tape
- Safety gear (gloves, goggles, mask)
Step-by-Step Instructions
Step 1: Choose Your Design
Decide on the type of furniture you want to create. Popular options include coffee tables, garden benches, shelves, or even bed frames. Sketch your design on paper, noting down measurements to guide your construction.
Step 2: Prepare the Pallets
- Inspect the Pallets: Check for any nails, splinters, or damaged wood. Remove any nails and repair or replace damaged sections.
- Clean the Pallets: Use a brush to remove dirt and debris. For a deeper clean, use a mild soap solution and let the pallets dry thoroughly.
Step 3: Sand the Wood
- Use sandpaper or an electric sander to smooth the surface of the pallets. Start with a coarse grit and progress to a finer grit until the wood is smooth to the touch. This step is crucial to prevent splinters.
Step 4: Cut and Assemble
- Measure and Cut: Use your design as a guide to measure and cut the pallets to the required sizes. A saw will help you achieve precise cuts.
- Assemble: Start assembling the pieces according to your design. Use a hammer and nails or a drill and screws to secure the pieces together. Ensure that the structure is sturdy and stable.
Step 5: Finish the Surface
- Stain or Paint: If desired, apply wood stain or paint to match your decor. Use a paintbrush or roller to apply evenly. Allow to dry completely.
- Seal (optional): For outdoor furniture, consider applying a sealant to protect against weather elements.
Step 6: Add Final Touches
- Add any additional features such as cushions for seating, glass tops for tables, or wheels for mobility.
Tips for Success
- Safety First: Always wear safety gear when handling tools and working with wood.
- Pallet Selection: Use heat-treated pallets (marked with “HT”) to avoid chemical contamination.
- Creativity: Don’t be afraid to experiment with different designs and finishes to make your furniture unique.
With these steps, you can turn unused pallets into beautiful, functional furniture that adds character and sustainability to your space. Enjoy your new creation! Check out this affordable pallet furniture online.
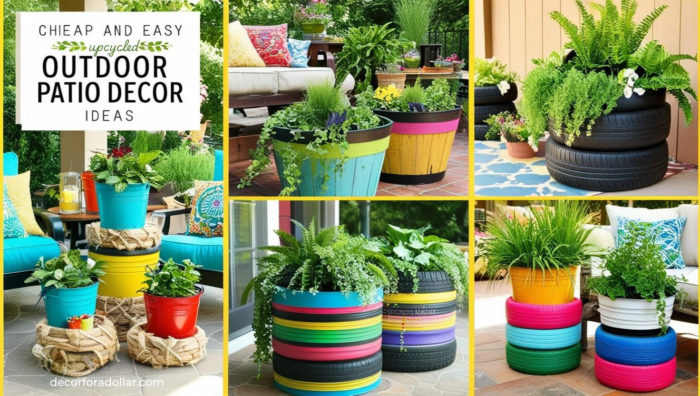
3. Upcycled Planter Ideas
Enhance your green space without spending a fortune by upcycling containers into planters. Items like old buckets, teapots, or even rubber boots can make unique planters. Arrange them artfully around your patio or balcony for an eclectic and lively touch.
Upcycled Planter Ideas: A Quick Tutorial
Transforming everyday items into unique planters is a creative way to add a touch of personality to your garden or indoor space. Upcycling not only reduces waste but also allows you to create beautiful, one-of-a-kind pieces. Here’s how you can turn common household items into stunning planters.
Materials Needed
- Old containers (mugs, teacups, cans, jars)
- Drill with a small bit (for drainage holes)
- Potting soil
- Plants or seeds of your choice
- Decorative materials (paint, ribbons, twine)
- Protective gloves (optional)
Step-by-Step Instructions
1. Choose Your Container
Select an old container you’d like to upcycle. This could be anything from a chipped teacup to an empty metal can. Make sure the container is clean and dry before you start.
2. Add Drainage
If your container doesn’t already have a drainage hole, use a drill to carefully create one at the bottom. This helps prevent waterlogging, which can harm your plants. For delicate materials like ceramics or glass, proceed with caution to avoid cracking.
3. Decorate Your Planter
Get creative with your decorations! You can paint the exterior of the container, wrap it with twine, or add embellishments like buttons or ribbons. Use weather-resistant paint or sealant if your planter will be outdoors.
4. Fill with Potting Soil
Add potting soil to your container, leaving about an inch of space from the rim. Choose a soil type that suits the plants you plan to grow—for example, cactus soil for succulents.
5. Plant Your Greenery
Carefully place your plant or seeds into the soil. If you’re planting seeds, follow the depth and spacing instructions on the seed packet. For small plants, gently firm the soil around the roots to provide support.
6. Water and Maintain
Give your new planter a light watering, ensuring the soil is moist but not soggy. Place your planter in a location that matches the sunlight requirements of your plant. Regularly check on your plants for water needs and prune as necessary.
Tips for Success
- Mix and Match: Combine different types of containers for an eclectic look.
- Layering Technique: Add rocks or pebbles at the bottom of the container for extra drainage and a decorative touch.
- Creative Spots: Consider hanging planters or placing them on shelves for added visual interest.
With these simple steps, you can upcycle old items into charming planters that bring life and creativity to your space. Happy planting!
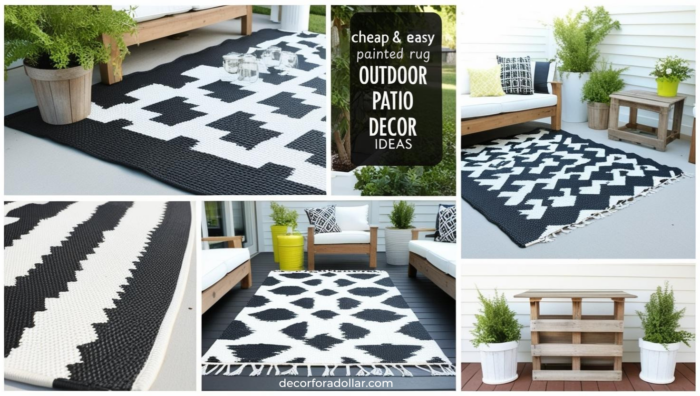
4. DIY Outdoor Rug
Add color and texture to your outdoor area with a DIY outdoor rug. Use durable fabric, such as a drop cloth, and paint it with a pattern of your choice using outdoor fabric paint. This project is easy to customize and will provide a cozy feel underfoot. Here’s a cheap outdoor rug that you can try with this DIY painting idea.
DIY Outdoor Rug Tutorial
Transform your outdoor space with a custom DIY outdoor rug that adds both color and texture. This easy project allows you to create a personalized design that suits your style and enhances your patio or garden area.
Materials Needed
- Durable fabric (such as a drop cloth)
- Outdoor fabric paint
- Paintbrushes or foam rollers
- Painter’s tape or stencils (optional)
- Protective tarp or old sheet
- Measuring tape
- Scissors
- Fabric sealer (optional)
Instructions
Step 1: Prepare Your Workspace
Select a Workspace: Choose a flat, well-ventilated area to work in, preferably outdoors or in a garage. Protect the Surface: Lay down a tarp or an old sheet to protect the surface from paint spills.
Step 2: Cut the Fabric
Measure the Area: Decide on the size of your rug by measuring the space where it will be placed. Cut the Fabric: Use scissors to cut the drop cloth to your desired dimensions.
Step 3: Design Your Rug
Choose a Pattern: Decide on a design or pattern for your rug. You can freehand paint, use painter’s tape to create geometric patterns, or employ stencils for intricate designs.
Plan the Layout: If using painter’s tape or stencils, arrange them on the fabric to visualize the final design.
Step 4: Paint the Rug
Apply the Paint: Dip your paintbrush or foam roller into the fabric paint and begin applying it to the fabric. Ensure even coverage for a professional look.
Layer the Colors: If you’re using multiple colors, allow each layer to dry before applying the next to prevent smudging. Remove Tape/Stencils: Carefully remove any painter’s tape or stencils once the paint is dry to reveal clean lines.
Step 5: Finish and Seal
Let it Dry: Allow the painted fabric to dry completely. This may take several hours or overnight, depending on the weather and humidity.Seal the Fabric: (Optional) To protect your rug from the elements, apply a fabric sealer according to the manufacturer’s instructions.
Step 6: Place Your Rug
Position the Rug: Once fully dry, position your new outdoor rug in its designated spot.Style the Space: Arrange outdoor furniture or decor items around your rug to complete the look.
Tips
- Test Colors: Before painting the entire rug, test the paint on a small fabric scrap to ensure satisfaction with the color and opacity.
- Weather Conditions: Consider bringing your rug indoors during extreme weather conditions to extend its lifespan.
- Maintenance: Clean your rug with a gentle soap and water solution when needed, and avoid harsh chemicals that may damage the paint.
Enjoy your new DIY outdoor rug, adding a touch of warmth and style to your outdoor living area! Here’s a cheap outdoor rug that you can try with this DIY painting idea.
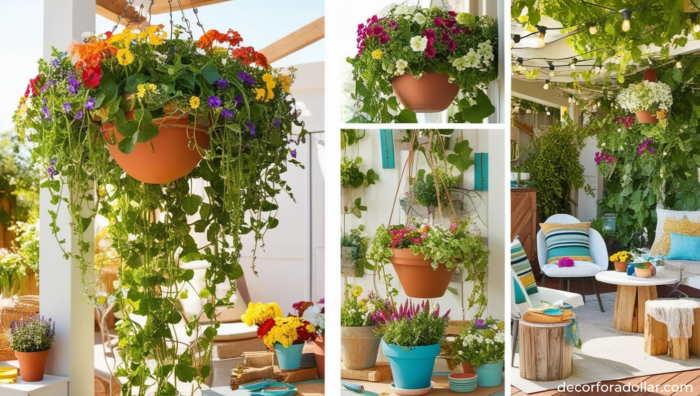
5. Hanging Garden
Maximize limited space by creating a vertical hanging garden. Use inexpensive materials like old wooden crates or recycled plastic bottles to hang your plants. This not only saves space but also adds a lush, green backdrop to your outdoor decor.
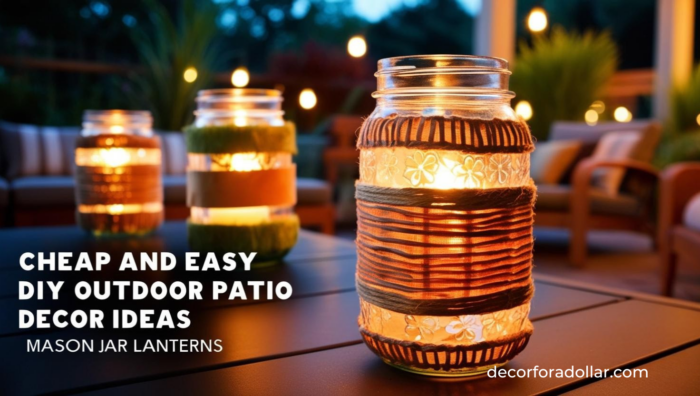
6. Mason Jar Lanterns
Mason jars are versatile and can be used to make charming lanterns. Simply place a tea light or LED candle inside a mason jar, and hang it using twine or wire. These lanterns can be hung from trees or placed on tables to provide cozy lighting.
DIY Patio Mason Jar Lanterns Tutorial
Transform your outdoor space with charming mason jar lanterns that add a warm, ambient glow to your patio. This simple DIY project is perfect for anyone looking to enhance their outdoor decor with a personal touch. Follow these easy steps to create your own lanterns.
Materials Needed
- Mason jars (any size)
- Wire (for hanging)
- Tea light candles or LED tea lights
- Sand, pebbles, or glass beads (optional, for weight)
- Decorative elements like ribbon, lace, or paint (optional)
- Wire cutters and pliers
- Scissors
Instructions
Step 1: Prepare the Mason Jars
- Clean the Jars: Ensure your mason jars are clean and dry before starting. This helps the decorations adhere better and ensures a clear glow.
- Add Weight: Pour a small layer of sand, pebbles, or glass beads into the bottom of each jar. This adds stability to the lanterns and prevents them from tipping over.
Step 2: Decorate the Jars
- Paint or Decorate: If desired, paint the outside of the jars or add decorative touches like lace or ribbon. Use acrylic paint for a translucent effect or spray paint for a more solid color. Allow the paint to dry completely before proceeding.
- Attach Ribbon or Lace: Wrap ribbon or lace around the jar mouth or body for an elegant touch. Secure with a small dot of hot glue.
Step 3: Add Wire for Hanging
- Cut the Wire: Use wire cutters to cut a piece of wire about 18 inches long. This will serve as the handle for hanging the jar.
- Create a Loop: Wrap one end of the wire around the neck of the jar just below the lid threading, then twist it together to form a secure loop. Use pliers to tighten and prevent slipping.
- Form the Handle: Bend the remaining wire into an arch to create a handle. Attach the other end to the opposite side of the jar’s neck, forming a balanced hanger.
Step 4: Insert the Lights
- Add Candles: Place a tea light candle or LED tea light into each jar. If using real candles, ensure they are secure and the flame does not touch the jar walls.
Step 5: Display Your Lanterns
- Hang or Place the Lanterns: Hang your lanterns from hooks or branches around your patio. Alternatively, place them on tables or ledges for a grounded display.
- Light the Candles: If using real candles, light them carefully and enjoy the soft glow. LED tea lights can be turned on and off as needed.
Additional Tips
- Safety First: If using real candles, never leave the lanterns unattended and ensure they are placed away from flammable materials.
- Weather Consideration: For outdoor use, ensure the lanterns are sturdy enough to withstand wind. Consider bringing them inside during inclement weather.
With these simple steps, your patio will be transformed into a cozy oasis perfect for entertaining or relaxing. Enjoy your beautiful, homemade mason jar lanterns!
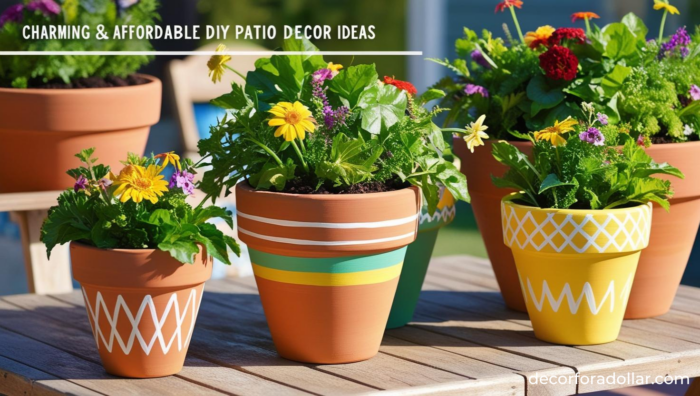
7. Painted Terra Cotta Pots
Revitalize plain terra cotta pots with a splash of paint. Use bright colors or patterns to give them a fresh look. Arrange these pots in clusters around your patio or balcony to create a vibrant, artistic display.
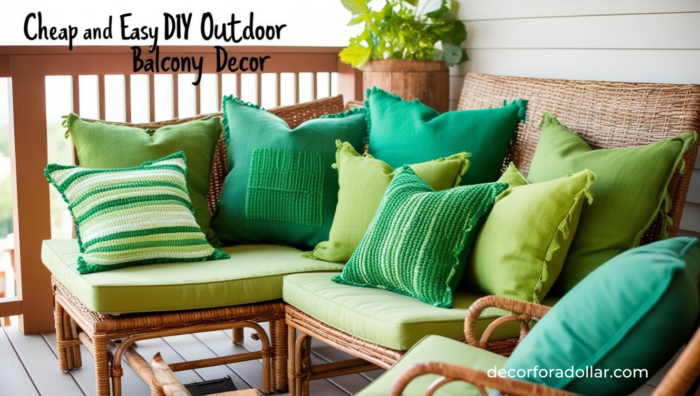
8. Outdoor Cushions and Pillows
Spruce up your seating area with colorful outdoor cushions and pillows. Opt for weather-resistant materials that can withstand the elements. Mixing and matching patterns and colors will add a playful and inviting touch to your space. Find affordable Outdoor Cushions here.
Quick Tutorial for Outdoor Cushions and Pillows
Transform your outdoor seating area into a cozy and inviting space by adding colorful cushions and pillows. This simple project not only enhances comfort but also brings a fresh and vibrant look to your patio or garden. Here’s how to create your own outdoor cushions and pillows:
Materials Needed
- Outdoor fabric: Choose weather-resistant and UV-protected fabric to ensure durability against the elements.
- Polyester fiberfill: Ideal for stuffing pillows, providing comfort and resilience.
- Foam cushion inserts: Choose the appropriate density for your seating needs.
- Sewing machine and thread: Ensure your thread is suitable for outdoor use.
- Fabric scissors and pins: Essential tools for cutting and securing fabric.
- Measuring tape: For accurate dimensions.
- Zippers or Velcro (optional): For removable covers, making cleaning easier.
Steps to Make Outdoor Cushions and Pillows
Step 1: Measure and Cut the Fabric
- Measure your inserts: Measure the foam cushions and decide on the dimensions for your pillows.
- Add seam allowances: Add about 1 inch to each side for seam allowances.
- Cut the fabric: Use fabric scissors to cut the fabric according to your measurements.
Step 2: Sew the Covers
- Pin the fabric: Place the fabric pieces with the right sides facing each other. Pin along the edges, leaving one side open for inserting the cushion or fiberfill.
- Stitch the edges: Use a sewing machine to stitch along the pinned edges, ensuring to backstitch at the beginning and end for durability.
- Turn the cover inside out: Carefully turn the cover right-side out by pulling it through the open side.
Step 3: Insert Cushions or Fillings
- Insert the foam or fiberfill: For cushions, insert the foam into the cover. For pillows, stuff with polyester fiberfill until you achieve the desired firmness.
- Close the opening: If using a zipper or Velcro, attach it to the open side. Otherwise, hand-stitch the opening closed for a seamless finish.
Step 4: Add Decorative Touches
- Mix and match patterns: Choose complementary patterns and colors to create visual interest.
- Add embellishments (optional): Consider adding piping, tassels, or buttons to enhance the design.
Step 5: Arrange and Enjoy
- Arrange your cushions and pillows: Place them strategically on your outdoor furniture to create a welcoming atmosphere.
- Enjoy your new space: Relax and enjoy the comfort and style of your revamped outdoor seating area.
With these simple steps, you can easily create custom outdoor cushions and pillows that reflect your personal style while adding comfort and charm to your outdoor spaces. Find affordable Outdoor Cushions here.
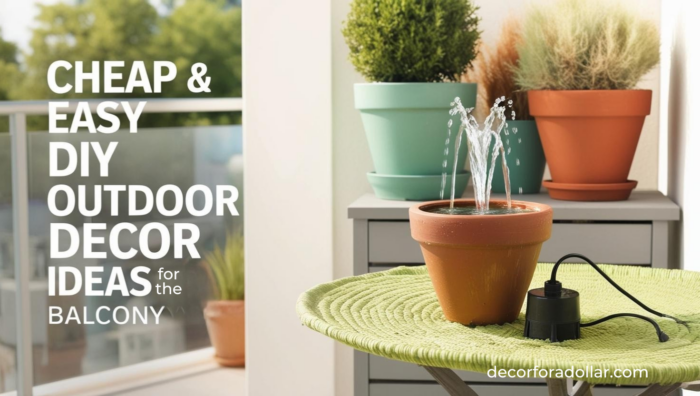
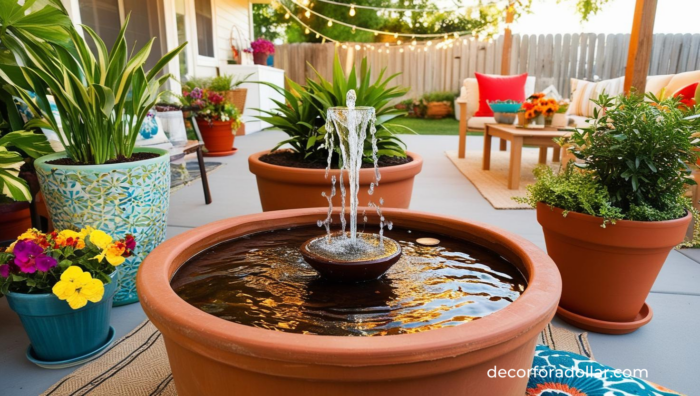
9. DIY Water Feature
Create a tranquil atmosphere with a simple DIY water feature. Use a large pot or container, a small water pump, and some stones to construct a bubbling fountain. The sound of gentle water will enhance the relaxation factor of your outdoor area. Get a Solar Powered Water Fountain Here (under $10) here!
DIY Water Feature Tutorial
Creating a DIY water feature is a great way to add a touch of serenity to your outdoor space. The gentle sound of flowing water can transform your garden or patio into a peaceful retreat. This simple project uses a large pot, a small water pump, and some stones to create a charming bubbling fountain.
Materials Needed
- Large Pot or Container: Choose a waterproof pot or container that suits your outdoor decor. It should be large enough to hold water and allow the pump to operate effectively.
- Small Water Pump: Available at garden centers or online, a small submersible pump will circulate the water.
- Flexible Tubing: Ensure it fits your pump’s outlet. This will guide the water to the top of the feature.
- Stones or Pebbles: Use to decorate and hold the tubing in place. Select a variety of sizes for a natural look.
- Water Source: To fill the pot and keep it topped up as needed.
Instructions
- Select a Location: Choose a spot for your water feature that’s close to an electrical outlet and visible from your seating area. Ensure the ground is level.
- Prepare the Pot: Place the large pot or container in your selected location. If the pot has drainage holes, seal them with waterproof sealant to prevent leaks.
- Install the Pump: Place the small submersible pump at the bottom of the pot. Make sure the power cord can reach the outlet. Attach the flexible tubing to the pump’s outlet.
- Arrange the Stones: Begin layering stones or pebbles around and over the pump, leaving the tubing exposed. The stones should be arranged to hide the pump but allow water to bubble up from the top of the tubing.
- Adjust the Tubing: Trim the tubing so it’s slightly below the top layer of stones. This will give the appearance that the water is bubbling directly from the stones.
- Fill with Water: Fill the pot with water until it covers the pump completely. It’s important to keep the pump submerged to prevent damage.
- Test the Feature: Plug in the pump and turn it on. The water should circulate through the tubing and bubble out from the stones. Adjust the stones and tubing as needed to achieve the desired water flow.
- Final Touches: Add a few decorative elements or small plants around the base of the pot for added visual interest.
Maintenance
- Water Levels: Regularly check and refill the water level to keep the pump submerged.
- Cleaning: Clean the pump and stones periodically to prevent algae build-up and ensure smooth operation.
With this DIY water feature, you can enjoy the soothing sounds of water in your own backyard, creating a tranquil environment perfect for relaxation. Get a Solar Powered Water Fountain Here (under $10) here!
10. Fabric Canopy
Add shade and style to your patio or balcony with a fabric canopy. Use an inexpensive curtain or fabric, and drape it over a sturdy frame or attach it to the walls. This addition will not only provide comfort but also lend a touch of elegance to your space. Get a water-resistant Outdoor Canopy here (under $20!).
Quick Tutorial: How to Make a Fabric Canopy
Adding a fabric canopy to your patio or balcony is an easy and affordable way to enhance outdoor comfort and style. Follow these simple steps to create your own elegant shade solution.
Materials Needed
- Fabric: Choose a durable outdoor fabric or an inexpensive curtain. The amount will depend on the size of your space.
- Sturdy Frame or Poles: Use pre-existing structures, or purchase poles from a hardware store.
- Rope or Cord: For securing the fabric to the frame.
- Hooks or Eye Screws: If attaching the canopy to walls or ceilings.
- Scissors: To cut the fabric to size.
- Measuring Tape: To ensure accurate measurements.
Instructions
Step 1: Measure Your Space
Begin by measuring the area you want to cover with the canopy. This will help you determine how much fabric you need. Consider the height, width, and depth of the space.
Step 2: Cut the Fabric
Based on your measurements, cut the fabric to the desired size. Make sure to leave a little extra on each side to account for any errors and to create a neat edge or hem.
Step 3: Prepare the Frame
If you have a pre-existing structure, skip this step. Otherwise, install sturdy poles or a frame in your desired location. Ensure they are securely anchored to support the weight of the fabric.
Step 4: Attach the Hooks or Eye Screws
For wall or ceiling installations, use hooks or eye screws. Place them strategically around the space where you want to drape the canopy. Ensure they are securely fastened.
Step 5: Drape the Fabric
Place the fabric over the frame or attach it to the hooks. Adjust the fabric until it drapes evenly, ensuring it covers the desired area. You can create a flat, pitched, or billowy effect depending on your preference.
Step 6: Secure the Fabric
Use rope or cord to tie the fabric securely to the frame or hooks. Make sure the fabric is taut but not overly stretched, which could cause tearing. Double-check all knots to ensure they are tight and secure.
Step 7: Final Adjustments
Once the fabric is in place, make any necessary adjustments to ensure it looks neat and provides adequate coverage. Trim any excess fabric, if needed, to maintain a tidy appearance.
Tips for Success
- Choose Weather-Resistant Fabric: Opt for UV-resistant and waterproof fabric for longevity.
- Check Local Weather: Ensure that your canopy can withstand local weather conditions, especially wind.
- Regular Maintenance: Periodically check the canopy for wear and tear, and tighten any loose knots.
With these steps, you can easily create a stylish and functional fabric canopy that enhances your outdoor living area. Enjoy your new shaded retreat! Get a water-resistant Outdoor Canopy here (under $20!).
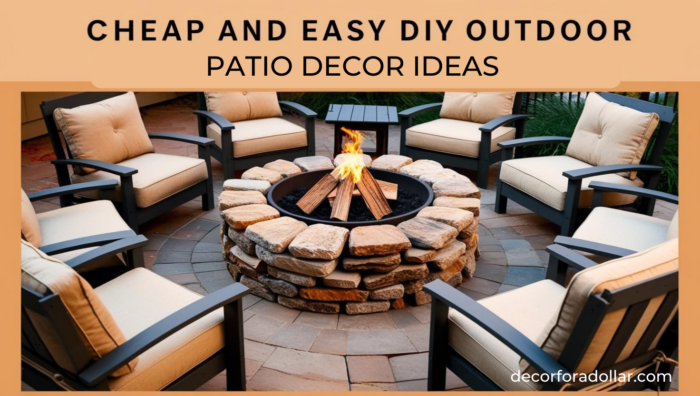
11. DIY Fire Pit
If space allows, build a small DIY fire pit using bricks or stones. This cozy feature can become the focal point of your outdoor gatherings, offering warmth and a place to toast marshmallows or enjoy a late-night chat. This is a cheap Fire Pit Insert for your DIY Fire Pit (under $40!).
DIY Flagstone Fire Pit Tutorial
Creating a flagstone fire pit is a great way to enhance your outdoor space, providing a warm and inviting area for gatherings. Here’s a step-by-step guide to building your own DIY flagstone fire pit.
Materials Needed
- Flagstones or flat stones
- Gravel
- Sand
- Shovel
- Level
- Metal fire ring (optional)
- Fire-resistant adhesive (optional)
Step-by-Step Instructions
Step 1: Choose a Location
Select a safe, level area in your backyard for the fire pit. Ensure it is away from any structures, trees, or flammable materials. Check local regulations or homeowners’ association rules regarding fire pits.
Step 2: Outline the Fire Pit
Decide on the size of your fire pit. Use a stick and string or a garden hose to outline a circle on the ground. A typical fire pit is about 36 to 44 inches in diameter.
Step 3: Dig the Foundation
Using a shovel, dig a circular hole about 6-8 inches deep within your outlined area. This will serve as the foundation for your fire pit.
Step 4: Add Gravel
Fill the hole with gravel, about 4 inches deep. This layer will help with drainage and provide a stable base for your fire pit.
Step 5: Level the Base
Use a level to ensure the gravel base is even. Adjust as necessary to ensure a stable foundation for the stones.
Step 6: Lay the First Layer of Stones
Begin placing the flagstones or flat stones around the edge of the gravel circle. Make sure the stones fit snugly together to form a solid ring. Use a level to ensure the stones are even.
Step 7: Build the Walls
Continue stacking the stones on top of the first layer, offsetting the joints for stability. Build up to your desired height, typically about 12-18 inches. For added stability, you can use fire-resistant adhesive between the stones.
Step 8: Install a Metal Fire Ring (Optional)
If you have a metal fire ring, place it inside the stone circle. This will help protect the stones from heat and prolong the life of your fire pit.
Step 9: Fill with Sand
Pour a layer of sand on top of the gravel base inside the fire pit to about 2 inches deep. This will help absorb the heat and protect the base.
Step 10: Enjoy Your Fire Pit
Once the fire pit is complete, it’s ready to use. Arrange seating around the pit and enjoy cozy evenings with friends and family.
By following these steps, you can create a beautiful and functional flagstone fire pit that becomes the centerpiece of your outdoor space. Enjoy the warmth and ambiance it brings to your backyard gatherings! This is a cheap Fire Pit Insert for your DIY Fire Pit (under $40!).
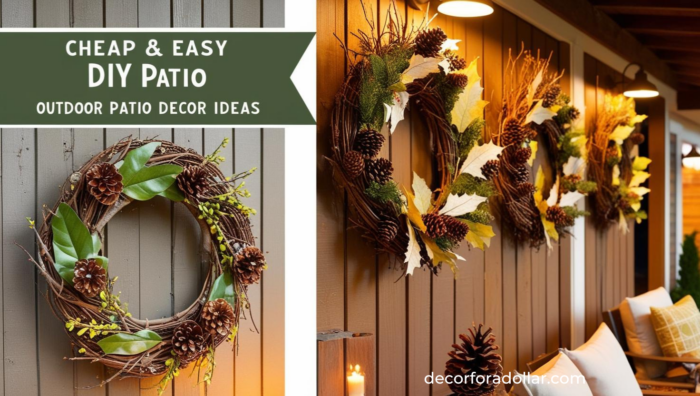
12. Seasonal Wreaths
Decorate your outdoor area with seasonal wreaths made from natural materials like twigs, leaves, or flowers. Hang them on doors or walls for a welcoming touch that changes with the seasons.
Wrap Up About Outdoor Decor Ideas for Your Patio or Balcony
By incorporating these affordable and easy outdoor decor ideas, you can transform any patio or balcony into a delightful retreat. Whether you’re looking to create a peaceful sanctuary or a lively gathering spot, these ideas will help you achieve a beautiful outdoor space without the hefty price tag. Enjoy the process of crafting your perfect outdoor setting and make the most of your alfresco living area!
Don’t forget…
Update your Side Yard on a Budget with YardZen
Transforming your side yard into a functional and visually appealing space can dramatically enhance the overall ambiance of your home. Drawing inspiration from Yardzen, an online landscape design service, we recently embarked on a journey to revamp our often-overlooked side yards. Here, we’ll share some innovative and practical ideas that have turned our narrow outdoor strip into a charming extension of our living space. Keep reading to see Our Side Yard Updates – Yardzen Inspired Side Yard Ideas!
Pin This Post for Later…
Similar articles you might also like…
12 Dollar Tree DIY Garden Decor Ideas To Spruce Up Your Yard
Disclaimer: This post may contain affiliate links or a sponsored post. All opinions are always 100% mine and I don’t partner with any product or company that I don’t use and love. Please see our Full Disclosure for more information.